Writing a Poll Mode Driver (PMD) for DPDK
Disclaimer: The information shared on this blog is for general informational purposes only and reflects personal views or experiences in technology. While I strive for accuracy, I cannot guarantee that all content is current or error-free. I am not liable for any loss or damage resulting from the use of this information. Please verify independently before acting on any advice.
**********************************************************************
Writing a PMD for DPDK

As mentioned in the previous post in this series about DPDK, I have
shared how to prototype L2/L3 applications using DPDK library
without any dependency on Hardware (Physical/Emulated).
In this post, I share how to write a PMD (Poll Mode Driver) for
DPDK, off-course, it will not cover all the enhancements and features present in industry grade drivers, which you can explore in
the existing PMDs in the DPDK source. Advanced features include,
queuing algorithms for QoS, Offloading features for Protocol
offloading, Protocol Parallelization features.
Here, we see how to write a PMD for a Network Interface Card,
most commonly found on your Desktop/Laptop, Realtek NIC card. The Realtek NIC on the physical hardware is 8136however, there is also a qemu-kvm based emulated NIC which can be configured on the virt-manager “8139”. Another emulated NIC e1000 exists which also has DPDK support, which also helps in doing tests to compare working and non-working implementations. Hence, I chose 8139 device to write a PMD. There is currently no PMD for Realtek 8139 devices, so its a good exercise to explore how PMDs are written as well as device drivers in General. The realtek NIC support in qemu-kvm is open-source and freely available. Writing a PMD for it should be considered purely educational and gives no competitive advantage over any other entity. Few years back, I attended a workshop from sysplay.in, and although I am not a driver developer currently, this was inspired from that session. It is a must attend workshop series for anyone who is interested in System Software interaction with hardware.
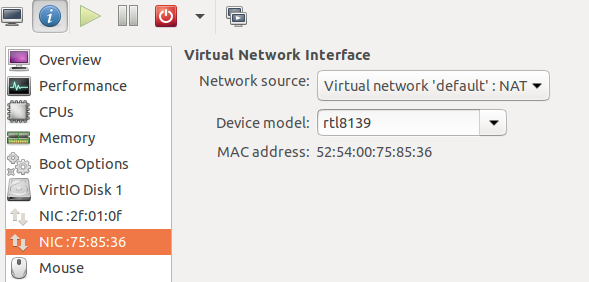
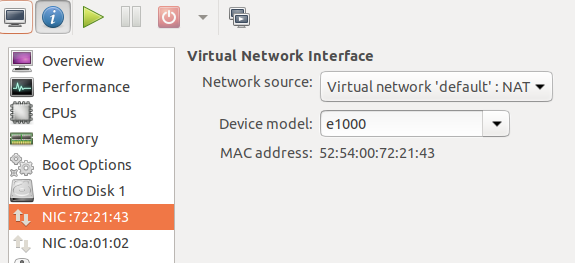
Using Virtual machine also helps to setup test environment on the host. For this purpose, my test environment includes 2 virtual machines running Ubuntu 18.04. I have enabled 2 NICS ( A & B) per Virtual machine. The goal of this experiment is to run dpdk-pingpong app as client and server. I used 1 virtual machine as a pingpong server on NIC-B which was based on e1000 emulated NIC, while the pingpong client is based on rtl8139 device (again NIC-B).
1. What is a PMD (Poll Mode Driver):
If you have gone through DPDK in general, the processing of IOs and Network packets, is being pushed to userspace. Whenever a device needs application to work dedicatedly towards processing IO or Network packets, you need to bypass the kernel storage/networking stack and directly access the hardware. The reasons to skip kernel is to avoid multiple copies of data before its processed, as well as, avoid multiple copies in the other direction as well.
2. How to access hardware directly in User space:
The linux kernel has features (kernel modules) to work with hardware directly. The Userspace-IO is a kernel module that exposes device registers to userspace applications through files. The user-space application then simply needs to open the binary files and access specific offsets of the device registers.
3. How DPDK uses PMDs:
DPDK has build options to compile your driver as a shared library or compile everything as a single combined library.
These options can be set/unset through the “.config” configuration file present in the build directory. Like the Linux kernel, DPDK provides software bus enumeration and device registration facility which your driver should use to register itself to the bus. All the bus enumeration and device registration happens either before your main() gets called, or through library provided function later called for init.
4. Testpmd to test your driver:
DPDK provides a testpmd application to test your driver. However, its not straightforward to integrate your driver with the application since, there are no generic function pointers provided to work with the driver functions, hence you separately compile your driver as a library and then compile the
testpmd alongwith the driver library to use the driver. You also need to write multiple #ifdefs and #if defined MACROs for your Vendor specific driver to call functions directly to setup the device. I instead used the dpdk-pingpong application which works in client and server mode. So I can send ping packets using the custom PMD that I have written to the server.
5. How to write the basic framework:
All DPDK compatible PMD drivers are present under the drivers/net hierarchy, so we will have to add a directory for our vendor specific driver here: drivers/net/realtek. We need to add the configuration options to COMPILE source under our driver directory in build/.config, CONFIG_…
In the driver directory, the Makefile should export headers which contain all functions that our testpmd would call, and finally in the testpmd make a provision to include our driver library before compiling.
DPDK framework provides following list of function pointers for
any PMD to implement.

As I said earlier, it is not necessary to implement all of these, and you can keep many of them as “nop”. The typical order in which the dev_ops are called is as below:
So, based on this sequence and carefully studying an existing Linux driver for the same device (or if you wish to directly right a PMD, I think you should still refer to an existing implementation for device programmability), I am able to port the 8139cp.c driver in linux-4.15. Essentially, the probe function calling the init of the driver, can be accommodated in the .dev_configure and .dev_start routines. Setting up the TX queues for establishing DMA addresses should be done in the .tx_queue_setup. The DMA APIs like dma_alloc_coherent() have counterparts available in the DPDK library:

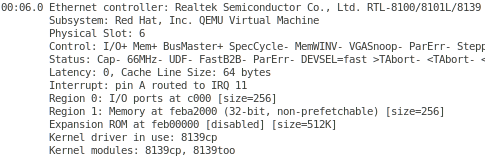
We attach our eth_dev_ops to dpdk provided eth_dev structure dev_ops handle. Also the 2 functions required to Transmit and Receive packets are also assigned to the DPDK provided handles, “realtek_recv_pkts” and “realtek_xmit_pkts”. We store the Register Space Base address from BAR1 into our device specific private structure struct realtek_eth_hw. The BAR1 is the non-prefetchable Memory mapped IO space provided in the lspci -vv output:
To transmit the packets refer to the below datasheet section:
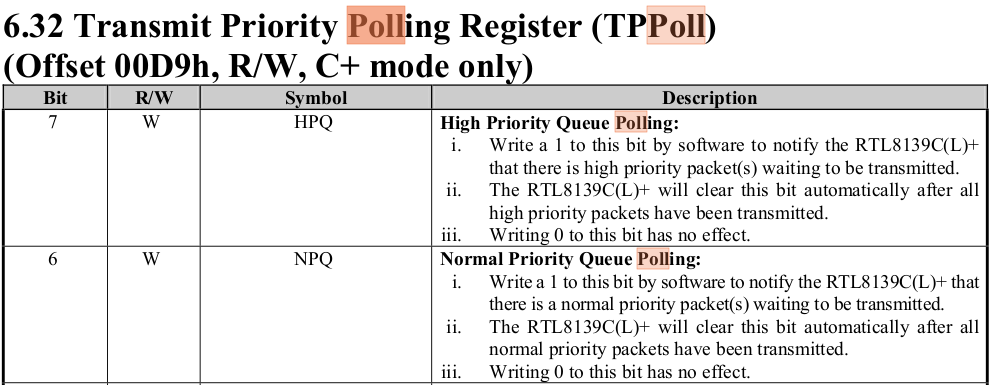
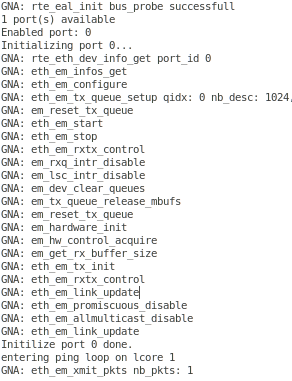
As soon as rte_mbuf packet is filled into the already established TX descriptor space, we can set the NPQ bit in the TPPoll Register. The device will take care of sending the packets for you. It will also set TxOK flag in the Interrupt Status register as stated below:


So based on the above description, your status should read 0x4 for TxOK.
Few tests which I ran to confirm the address is being accessed correctly:
(these are device specific, so I will share the relevant data sheet section for reference)
1. Test the Device reset functionality:
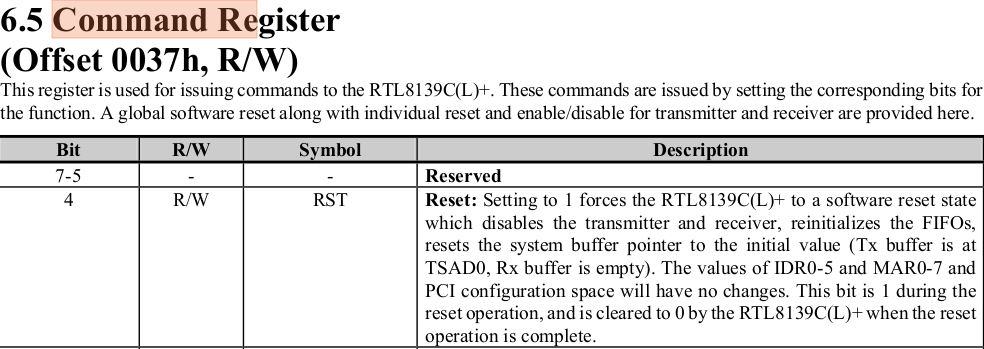
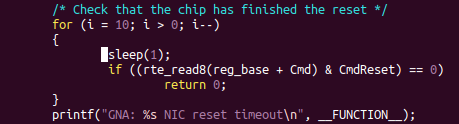
As per the datasheet, I must write a Reset command to the Command Register. Then the device does a soft reboot and Resets (=0) the value of the Command register. To test this poll the command register for few seconds and if the Command Register is not reset to 0 then mark timeout and return error.
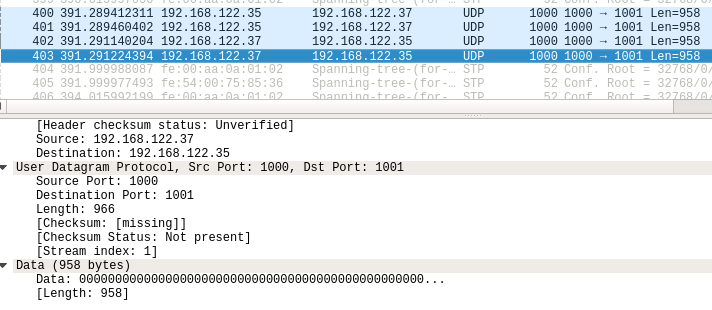
2. Run pingpong application to test the TX functionality:
On the VM-A where we use e1000 NIC, will work as a pingpong server.
On the VM-B where we use rtl8139 NIC, will work as a pingpong client.
At the time of writing this blog, I have not written the RX functionailty hence using the rtl8139 side for sending Pings alone, pongs would be sent by server, but not reported. Follow the instructions mentioned in the dpdk-pingpong github repository to build and run the app as client or server. Use “-l 0,1" instead of “-l 1,2” in case you only configure 2 CPUs in virt-manager.

Comments
Post a Comment